Wednesday 18 June 2014
Dragon Tales
Check out Jo Empson's blog for a fab account of our puppets' exciting day out at Wychwood Festival!
Wednesday 11 June 2014
Bench Mark
When my son asked me why benches in bus shelters were so narrow and uncomfortable, I was forced to explain to him the depressing reason for this - to prevent homeless people from sleeping on them. Benches that can't be sat on are now commonplace in our cities.
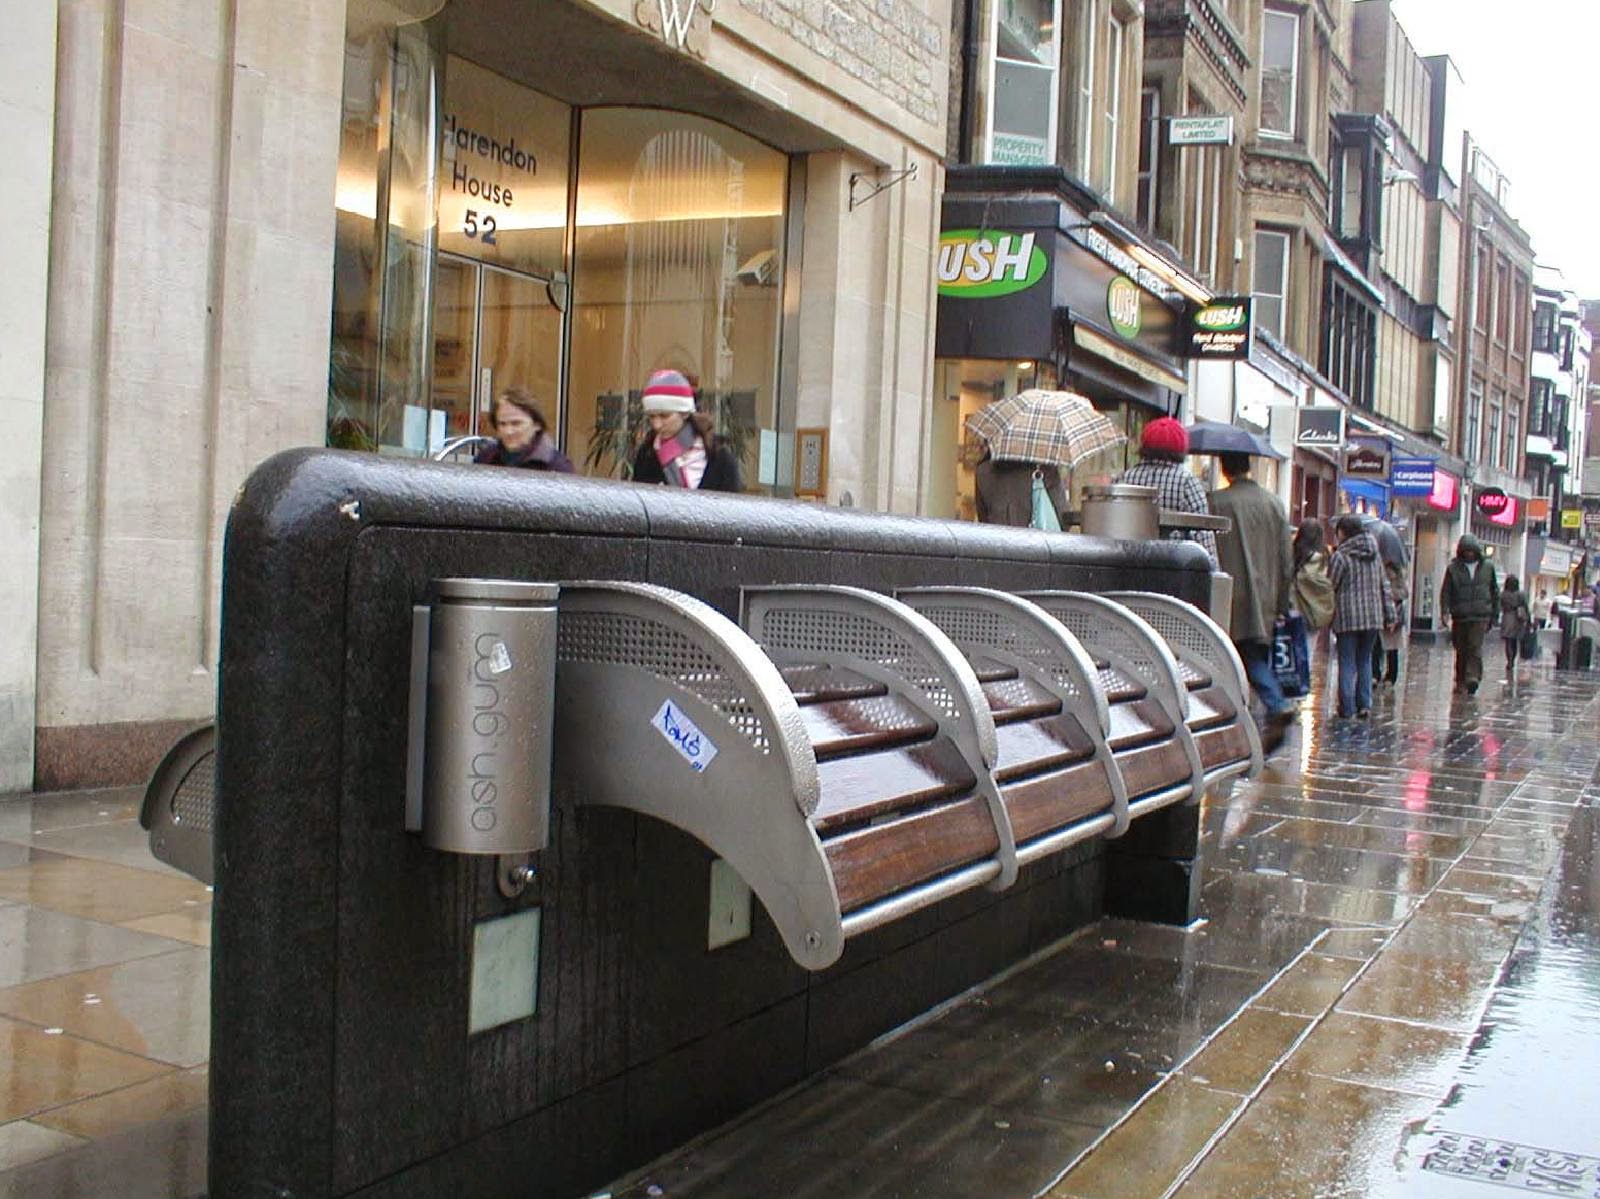
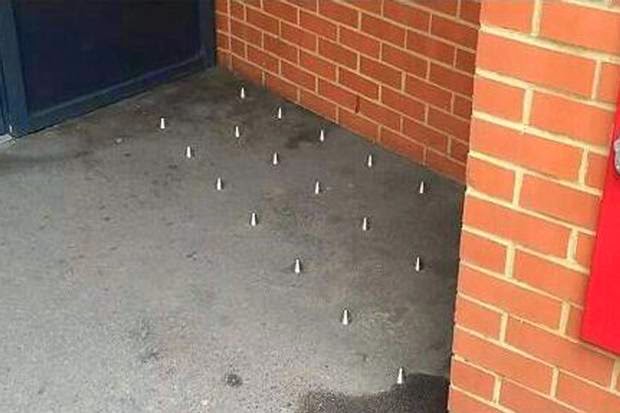
This mean-spirited attitude has reached new levels with the advent of homeless spikes. How proud the person must be who first thought of these disgusting little things. What a great way to address the problem of homelessness.
As Alex Andreou said in the Guardian this week, it's a sign which reads "Not even this patch of earth. Not even for the night."
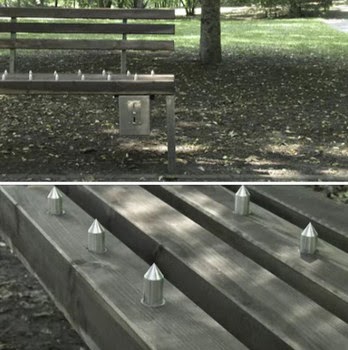
If you thought things couldn't get any worse, this spiked bench was designed by artist Fabian Brunsing. The spikes temporarily retract when a coin is inserted. An installation with a message, I'm sure. A message completely missed by officials of Yantai Park in China, who thought it was a great idea and apparently installed them there. How long until they appear here, I wonder?
It's incredibly sad that human beings are deliberately depriving other human beings of places to rest.

But. For now, there is still happiness and laughter to be found on benches.

Wonderful.
Wednesday 4 June 2014
How to Make a Dragon
I've been busy making a new puppet for the lovely Jo Empson, and thought I would share the process with you. (And me, as I sometimes forget how I did things!)
 I was to be re-creating the head of the dragon from the above illustration (copyright Jo Empson), from her picture book "Never Ever", to go with the girl character I made last year.
I decided to make this puppet using the "foam and fleece" method, as is used for the Muppets. Most of the puppets I have made before were either fully textile, or papier mache, but as this puppet needed to be large I thought this would be nice and light, and also look bold and child-friendly. So - here we go!
1. First, I assembled my chosen studio companions.

(For future reference, note to self - try to choose companions that don't poo on the floor. Bea, I'm looking at you. Don't think I didn't notice, because I did.)
2. I made a pattern from paper for the puppet's mouth plate.

3. I cut the mouth plate out from cardboard. This isn't the best material to use actually - some kind of plastic would be better but I didn't have anything large enough. Then I covered the cardboard with red fabric. I used a kind of wincyette because that's what I had, but a lot of puppet makers use felt. Also most people glue the fabric to the board or use self adhesive felt. But I find sewing less scary as it's undo-able!

4. I made a black "hole" and a pink tongue from felt and glued them on. I used fabric glue…but more about glue later.

5. The mouth plate started to crease, so I strengthened it by gluing on some jersey fabric, painting on fabric stiffener, and adding a piece of card.
 You can see above that at this stage I made some foam finger holes, because I intended this to be a glove puppet. However, later on it became clear it was too long and weighty to be worked with one hand, so I removed them and made hand holes instead. Here I also started the top of the head by putting the mouth plate on a piece of 1" foam and drawing round it with a large border to allow for shaping it.
6. I started putting notches in the foam to sculpt it. The black line you can see is the size and shape of the mouth plate.

7. Then I glued the notches together using the hot glue gun. I did the same with the bottom jaw afterwards. (The bottom jaw is 1/2" foam.)
 Throughout all these pics you will notice a range of different glues which I bought and tried and failed with during this process. I even glued my own hands with Gorilla Glue, which swells up. (And, NB, doesn't stick foam). It made my hands so sticky that I couldn't sew afterwards for ages. I used so many chemicals trying to get it off I think I actually took the top layer of skin off. I tried Copydex and PVA, but settled on the hot glue gun which does stick foam very well.
(Most painful place to burn self with hot glue gun? Crook of thumb.)
8. Now to cover the foam with fleece. Die hard Muppet makers use Antron Fleece, but this is just ordinary polar fleece, available online. I draped the fleece over the foam, pinned it in place and made pleats where necessary to smooth it out. I intended to cut away the excess and join the edges. But eventually I decided to sculpt the pleats into nostrils, which you will see later.


Online there are many tutorials and tips for sewing fleece to foam. Some people make a pattern from other fabric, transfer it to fleece and then sew it inside out. As this puppet is quite quirkily shaped and large, I just trimmed and stitched as I went along.
9. I sewed the mouth plate to the fleece. Some puppet makers glue it in. I used a kind of whip stitch. There are several stitches you can use including "Henson Stitch". Fleece seems to be quite forgiving and the stitches do sink in quite nicely. You can fluff up the stitched line with the tip of the needle and this hides them even more.

10. I was using polystyrene balls for eyes. It's possible to use ping pong balls or fishing floats too. I drew the pupils on with a Sharpie. I then made a strap with fleece to sew onto the puppet. Then with another semicircle of fleece, I made eyelids which I sewed on.

 You can see the nostrils here too.
11. Now for the final embellishments. I made teeth by cutting out foam, covering it with white fleece and sewing them in place.


12. Then, I made coloured spots from other scrap fabric, and a couple of spikes from 1/2" foam covered with red towelling. I glued on the spots using fabric glue and sewed on the spikes.


Voila! And here he is in action at the Wychwood Festival. The children certainly seemed to like him!

I used plenty of websites and books to help me with this process. I will compile a list of them and put it on the side (if I can work out how!). Puppet making is fun!
I decided to make this puppet using the "foam and fleece" method, as is used for the Muppets. Most of the puppets I have made before were either fully textile, or papier mache, but as this puppet needed to be large I thought this would be nice and light, and also look bold and child-friendly. So - here we go!
1. First, I assembled my chosen studio companions.
(For future reference, note to self - try to choose companions that don't poo on the floor. Bea, I'm looking at you. Don't think I didn't notice, because I did.)
2. I made a pattern from paper for the puppet's mouth plate.
3. I cut the mouth plate out from cardboard. This isn't the best material to use actually - some kind of plastic would be better but I didn't have anything large enough. Then I covered the cardboard with red fabric. I used a kind of wincyette because that's what I had, but a lot of puppet makers use felt. Also most people glue the fabric to the board or use self adhesive felt. But I find sewing less scary as it's undo-able!
4. I made a black "hole" and a pink tongue from felt and glued them on. I used fabric glue…but more about glue later.
5. The mouth plate started to crease, so I strengthened it by gluing on some jersey fabric, painting on fabric stiffener, and adding a piece of card.
6. I started putting notches in the foam to sculpt it. The black line you can see is the size and shape of the mouth plate.
7. Then I glued the notches together using the hot glue gun. I did the same with the bottom jaw afterwards. (The bottom jaw is 1/2" foam.)
(Most painful place to burn self with hot glue gun? Crook of thumb.)
8. Now to cover the foam with fleece. Die hard Muppet makers use Antron Fleece, but this is just ordinary polar fleece, available online. I draped the fleece over the foam, pinned it in place and made pleats where necessary to smooth it out. I intended to cut away the excess and join the edges. But eventually I decided to sculpt the pleats into nostrils, which you will see later.
Online there are many tutorials and tips for sewing fleece to foam. Some people make a pattern from other fabric, transfer it to fleece and then sew it inside out. As this puppet is quite quirkily shaped and large, I just trimmed and stitched as I went along.
9. I sewed the mouth plate to the fleece. Some puppet makers glue it in. I used a kind of whip stitch. There are several stitches you can use including "Henson Stitch". Fleece seems to be quite forgiving and the stitches do sink in quite nicely. You can fluff up the stitched line with the tip of the needle and this hides them even more.
10. I was using polystyrene balls for eyes. It's possible to use ping pong balls or fishing floats too. I drew the pupils on with a Sharpie. I then made a strap with fleece to sew onto the puppet. Then with another semicircle of fleece, I made eyelids which I sewed on.
11. Now for the final embellishments. I made teeth by cutting out foam, covering it with white fleece and sewing them in place.
12. Then, I made coloured spots from other scrap fabric, and a couple of spikes from 1/2" foam covered with red towelling. I glued on the spots using fabric glue and sewed on the spikes.
Voila! And here he is in action at the Wychwood Festival. The children certainly seemed to like him!
I used plenty of websites and books to help me with this process. I will compile a list of them and put it on the side (if I can work out how!). Puppet making is fun!
Subscribe to:
Posts (Atom)